CAME-PRODIGY RESTORATION PROCESS
Included in this document are steps that are intended to return CAME-Prodigy gimbals that were programmed with firmware version 2.60 b4 back to its default factory settings. Please follow instructions carefully & perform at your own risk.
THINGS TO CHECK:
- Make sure Prodigy battery is fully charged
- Make sure the camera & lens setup is within the 15 lbs (7 kg) payload and perfectly balanced on the gimbal.
- Make sure you are using a Mini USB cable that is capable of data transfers (ex: the type used for hard drives. Cheaper cables used primarily to charge smartphones likely will not work)
WARNINGS & DISCLAIMERS:
- Do NOT share this document with other Prodigy owners as their firmware version may be different and could potentially cause malfunction to their gimbal.
- Do NOT make any changes to settings that are not shown in this document, and were not directly recommended by CAME-TV personnel.
- Most importantly, do NOT upgrade your firmware.
1. FAMILIARIZE YOURSELF WITH THE SIMPLEBGC SOFTWARE - Before starting, please review the following articles so that you're further educated on the software tuning process and the dangers of making certain tuning adjustments (without our guidance).
How Do I Download, Install, and Launch SimpleBGC Software on MAC OSX or Windows?
What to do when SimpleBGC tells you to upgrade your firmware.
How do I know what SimpleBGC software version to use?
Once you're ready to move forward, first please make sure that you are using SimpleBGC version 2.60 b4.
2. SAVE YOUR PROFILES BEFORE STARTING - Secondly, please save your current profiles as they are. This may be useful if you need to revert to them, or if further analysis needs to be done.
How to save your gimbal profiles using SimpleBGC
3. RESTORE YOUR PRODIGY GIMBAL - Once you have your profiles saved, please review the video below showing a restoration process for the CAME-Single. Though 2 different gimbals, the process for Prodigy restoration is fairly similar to the one for the Single.
IMPORTANT NOTES: As you see in the video above, the restoration process is performed using the CAME-Single. Though fairly similar for the Prodigy, you will find a few key steps that are different below.
A) USE THIS PROFILE FILE: However, the main and most important difference is that you will use the profile linked below, and NOT the profile mentioned in the video:
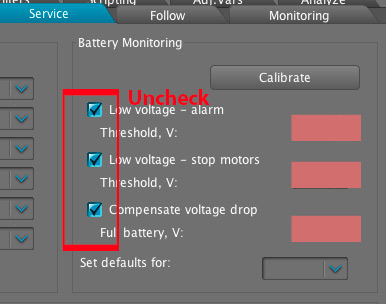
B) TEMPORARILY DISABLE BATTERY MONITORING OPTIONS: To add one step that is not in the video, we'd suggest unchecking your battery monitor warnings immediately after loading all 3 default profiles (around 3:30 mark). See below for reference:
C) MAKE SURE ALL MOTOR INVERT RESULTS ARE APPLIED TO ALL 3 PROFILES: And after the Motor Invert process, whatever invert options were selected, you may need to manually apply them to the other 2 profiles (and make sure all NUM.Poles are 14, not 22). All other processes should be as they are shown in the video.
D) ENCODER CALIBRATION PROCESS: With firmware version 2.60 b4, the Encoder Calibration process is automatically performed by the gimbal itself. So unlike the sequence at about 7:20 in the video above, you do NOT have to pick the gimbal up and move it around during the calibration process. Instead, after clicking the 1.Calib.El.Field button, simply let the gimbal rest on the gimbal stand on your table and the gimbal itself will perform these movements for you.
IMPORTANT: As these movements are automatically happening, we'd suggest keeping your hands around the camera frame (but not making contact) because there is a chance that the gimbal frame may start spinning on its own after the encoder calibration is completed. This is a somewhat normal process, but we strongly suggest keeping your hands surrounding the camera and manually stop it from spinning after the encoder calibration process is done. After the step 1 encoder calibration, you will re-follow the video as instructed with the 2. Calib.Offset step. Once you click on the 2. Calib.Offset button, your gimbal should be stabilized and your horizon will be set/calibrated. The final step after calibrating the offset is re-programming of Follow modes as shown in the video.
If performed correctly, this process should get your Prodigy gimbal in normal working condition. Once your gimbal is fully restored and functional, you can also re-check the battery monitoring options. Make sure to click WRITE to save afterwards.
If the complete process does not work the first time around, we'd suggest performing it a second time to make sure you did not miss any steps. Nonetheless, it should get you back up and running. Once your Prodigy gimbal is indeed in working as normal, be sure to re-save your profiles and name appropriately name the filename so that it is easily identifiable.


