CAME-TV Waero & Kuminik8 Frequently Asked Questions
Table of Contents
Solutions Options:
What models do you have?
Should I choose EU or US version?
What is the difference between Waero and Kuminik8 headsets?
Are Waero headsets compatible with Kuminik8 headsets?
Features:
How do the headsets work?
Do your wireless headsets work for a team of 15 people?
What type of batteries are supplied for the headsets?
How long does the battery last?
What is the Waero Pro's battery life?
What is the function of the MF button on the Waero Pro headset?
What is the function of the two CAME-NANO Remote units in the WAERO Pro 16-piece set?
What’s the difference between the Kuminik8 single ear headset and the Waero pro headset?
Is frequency adjustment available on Waero Pro?
Can I use USB-C charging for continuous operation on Waero Pro?
What battery model does the Waero Pro use, and is it identical to the Kuminik8's battery?
Usage environment:
How many kits of the wireless headsets can be used in one room at the same time? What about in an outdoor setting?
Can headsets be used at a live event such as a noisy concert?
How can I distinguish between the Master and Remote units of WAERO Pro?
Does WAERO PRO have noise-cancellation capabilities?
What’s the maximum number of connections of waero-pro?
Combination of headset options:
Can I add more headsets to my 2pcs/3pcs kits to combine into 4 pcs or 7pcs kit?
How can I build a 9pcs kit from a 4pcs kit?
Can 2pcs and 4pcs kits be combined into an 8pcs kit?
I already had the 5-pack Kuminik8 headsets, can they work together with the Waero Pro to be a new 9-pack kit?
Can WAERO-PRO be added to existing KUMINIK8 systems?
After Sales:
How can I know which group the headset is?
How can I clear the data of the Hub or master headset?
What can I do if group A can’t communicate with Group B?
What can I do if I want to add more headsets to my 4 pcs headset kits? Such as if i want to make a group of 9 based on 4 pcs kit?
What is the maximum number of remote headsets connected to the master headset?
How do you enter and exit pairing state for headset and hub?
How do you pair remote headsets to the master headset?
How do you pair remote headsets to the hub?
How do you pair master headset to the hub?
How to unpair/clear selective headsets from master/hub?
How to unpair/clear all headsets from master/hub?
How to divide 9 pcs kits into 2 groups and use them?
How to determine the remote headset belongs to which master headset for 9 pcs kit?
How do you get optimal reception?
What do you do when a remote headset is disconnected?
How do I divide WAERO PRO into A/B groups?
What models do you have?
We have two series headsets - the Waero Pro and Kuminik8 .
The Waero's feature a single ear pad and the KUMINIK8's are available in two styles - single ear & double ear pads.
Each headset is available in EU and US versions for the area of use.
Each type of the headsets are available in packages of 2/3/4/7/9-piece kits.
Should I choose the EU or US version?
The main difference between the US and EU versions are the frequencies. It's to ensure that the headsets do not interfere with the countries emergency and other important frequencies.
US for the US, while EU for EU countries. Other countries can use either version if it does not have the regulation on frequency use.
What is the difference between the Waero and Kuminik8 headsets?
Transmission Range:
Waero: 366 meters,1200ft (open space).
Kuminik8: 450meters,1500ft (open space).
Waterproof:
Kuminik8 features waterproof IP63
The Kuminik8 headsets features a metal frame inside the headband which makes it stronger and more durable but also more flexible. This metal wire frame design offers more comfort for those looking for a larger size headset. The ear cushions on the Kuminik8 are also larger with a bit more extra padding compared to the Waero.
Are Waero headsets compatible with the Kuminik8 headsets?
Yes, all of our wireless communicator models can paired with each other for flexible use.
How do the headsets work?
The core of this communication system is the pairing of the master headset and the remote headset:A Master headset can be paired with up to three Remote headsets and a remote headset can only be paired with a master headset.
*A master headset cannot be used as a remote headset.*
Communication system without hub:
One master headset can be paired with up to three remote headsets for a total of four headsets.
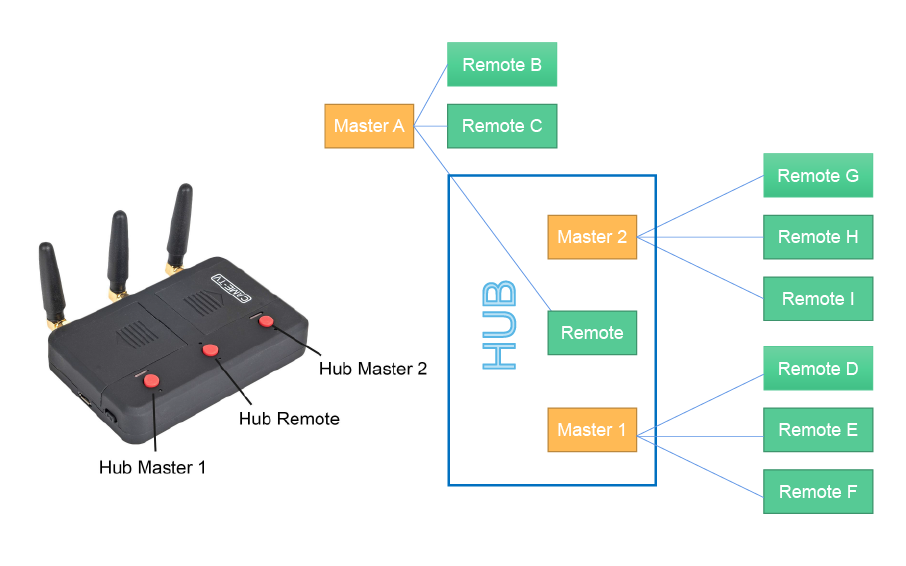
Communication system with a hub:
One master headset and a hub can pair with up to eight remote headsets for a total of nine headsets. The hub can also be converted into a communicator with 10 communication units by connecting 3.5mm headphone cables externally.
Can your wireless headsets work for a team of 15 people?
Yes, it can work for a team of 15 people by adding two hubs, but the communication quality and distance will suffer as the number of hubs increases.
What type of batteries are used for the headsets?
The batteries used are the common NB-6L batteries and normally can be easily purchased locally.
How long does the battery last?
2Kit:
Master headset 10 Hours.
Remote headset 13 Hours.
4Kit:
Master headset 8.5 Hours.
Remote headset 13 Hours.
5Kit:
Master headset 7.5 Hours.
Remote headset 13 Hours.
Hub: 5-14 Hours.
Please Note: These are estimated times depending active headsets. The Master headset and Hub handles the communication data between all Remote headsets, the more connected Remotes the faster the Master and/or Hub will drain.
How many kits of the wireless headsets can we use in one room at the same time? What about outdoor places?
When using indoors in a small space, it is recommended to not use more than 3 kits at the same time.
There is no limit to quantity for outdoor use.
Can the headsets be used at a live event such as a noisy concert?
Yes, and we recommend the Kuminik8 dual ear kit, which features dual earmuffs that can isolate the interference from the environment.
Can I add more headsets to my 2pcs/3pcs kit to combine it into a 4 pcs kit or 7pc kit?
Yes, you can purchase the corresponding version of the remote headsets and pair it with your master headset to combine it into a 4pcs kit.
If you require more than 4pcs headsets, a hub is required as well. After re-pairing, you can combine them to a 7pcs kit.
How can I build a 9pcs kit from a 4pcs kit?
You can purchase the corresponding version of the remote headsets and hub, and re-pair them into a 9pcs kit.
Can 2pcs/4pcs kits be combined into a 8pcs kit?
No, when combining over 4pcs headsets, a hub is required. If you add a hub, you can pair with one master headset and 6pcs remote headsets for a total of 7 headsets.
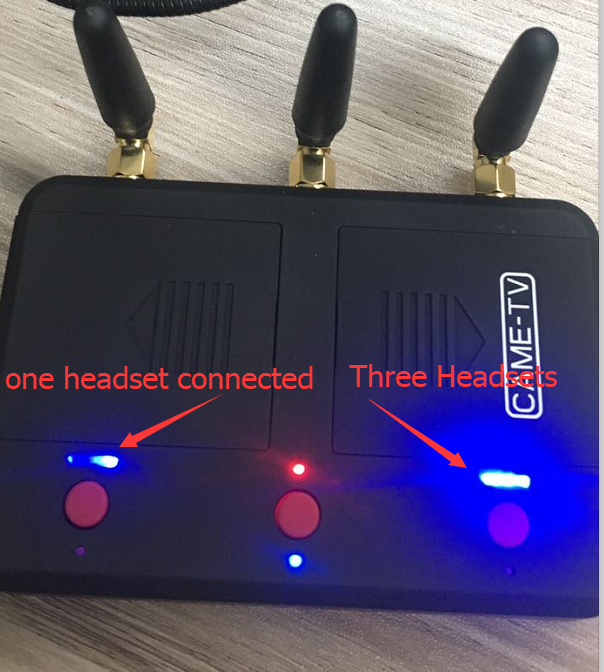
How can I know which group the headsets are in?
Each headset indicate one indicator light on the hub. If you take out the battery, there should be one indicator light that goes off.
How can I clear the data of the Hub or master headset?
Activate the pairing mode of the master headset or Hub. After, hearing the pairing tone in the headset, release the volume buttons and quickly press the middle button 7 times, wait 30 seconds, remove the battery, and re-install the battery to boot up.
Steps to clear HUB registration information:
- Press and hold the key first
- wait for the indicator light to flash slowly in blue, and then press it 7 times continuously.
- After a few seconds, you should see the indicator light flash quickly, indicating that the removal is successful.
Steps to clear the registration information of the remote and the master: same as the HUB step, but the keys are replaced with "volume +" & "volume -" buttons.
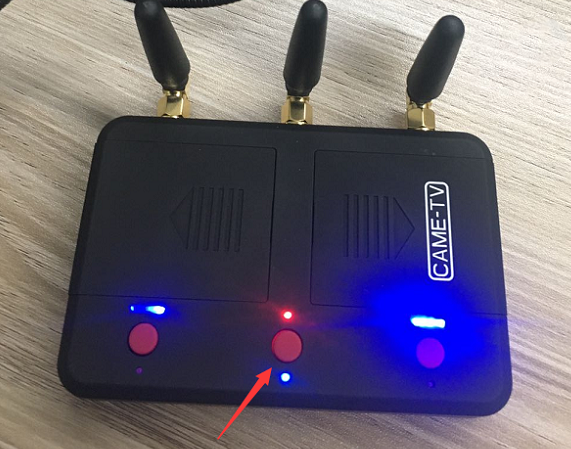
What Can I do if group A can’t communicate with Group B
Step One:Short press middle button in Hub.
If the three headsets LED indicators of Group A are all solid and cannot communicate with group B, it may be because the function button in the middle of the HUB has blocked the connection. The solution is quite simple -- A short press of this button can restore both groups A&B communication.
Step two: Clear data's and repairing.
If the above operation(step one) does not solve the problem, the possible reason is that the master in group A had been paired with the third remote other than two, thus the pairing data of the master needs to be cleared and paired again. Proceed as follows:
- Remote preparation --- Take out the batteries of the two slaves with blue lights in Group A, and install the batteries in the master.
- Master preparation --- Press both volume buttons at the same time for 3-5 seconds, the host enters the pairing mode, the LED indicator will start to flash, after hearing the pairing tone in the headset, release the volume buttons and quickly press the middle button 7 times, wait for 30 seconds, remove the host battery, and re-install the battery to boot.
- The master enters the pairing mode, press and hold the middle button of the HUB until the indicator light flashes quickly, the host and hub enters the pairing mode, wait a few seconds, there will be a beep when the pairing is successful.
- Install the battery in the Remote 1 in Group A, enter the pairing mode, and pair with the master. After the pairing is successful, then Remote 2 repeats the above pairing operation.
Pairing six remotes in Group B with the HUB
Remote preparation --- Take out the batteries of the six remotes in Group B, install the battery in the HUB to start.
Pair the three remotes on the left
- Clear the data on the left hub --- Long press the left button on the HUB to enter the pairing mode, after the indicator light flashes quickly, press the left button 7 times continuously
- Long press the left button again to enter the pairing mode, take out one of the earphones, install the battery, press and hold the two volume keys at the same time after turning on the headphone to enter the pairing mode. Wait for about 5 seconds, there will be a sound prompt for successful pairing.
- Repeat step 2 for remote 2 and remote 3. After the three headphones are paired successfully, the three indicators on the left hub function key will light up at the same time. The pairing is successful.
If all 6 remote headsets have been paired but the left three headsets can not hear the master or the other three remote headset, you can try to short press the left function button on the hub to check if they are connected.
The three earphones on the right are paired in the same way as on the left.
After the pairing is complete, observe whether the indicators of the 9 headphones are solid, and observe whether the indicators on the hub are all on.
If the group cannot communicate at the same time, you can short press the function key on the hub to resume communication.
What can I do if I want to add more headsets to my 4 pcs headset kit? Such as if i want to make a group of 9 based on a 4pcs kit.
First, you need to buy one extra Hub and 5pcs remote headsets.
The pairing steps are below:
- Power on HUB and master A and another one or two remote Headsets from kit 4. (Important: make sure there is at least one remote headset(mark it as headset D) of kit 4 that is powered off and without the battery installed.)
- Long press the middle button on the HUB until the blue light flashes to enter the pairing state
- Long press the left and right volume buttons of the master A until the red light flashes. Wait for a while, if the indicator light turns to solid, it means that the pairing with the HUB is successful.
- Long press the left button on the HUB until the blue light flashes, waiting for pairing. Then D, E & F remotes are powered on in turn, and then press and hold the two volume keys on the left and right of the remote to pair with the host module on the left of the HUB (3 indicator lights are all on)
- Long press the right button on the HUB until the blue light flashes, waiting for pairing. Then the G, H, & I remotes are powered on in turn, and then press and hold the two volume keys on the left and right of the slave to pair with the master module on the right of the HUB (3 indicator lights are all on)
Here is the video.
What is the maximum number of remote headsets connected to the master headset?
The maximum number of remote headsets connected to the master headset: WAERO is equipped with a maximum of 3 remote headsets, and KUMINIK8 is equipped with a maximum of 4 remote headsets
How do you enter and exit pairing state for headset and hub?
Enter pairing state
Headsets: Press the volume key + and volume key - at the same time
HUB: Long press the pairing button
Exit pairing state
When the maximum pairing quantity of the master is reached, the master will automatically exit the pairing state. If the maximum number is not reached, operate as follows
Master Headset: Press the power button once
HUB: Long press the pairing button
How do you pair remote headsets to the master headset?
Master A enters the pairing mode, and the remote headsets proceed one by one in order, and then proceed to the next one after pairing one.
How do you pair remote headsets to the hub?
Suggestion: pair the HUB master on the left first, and then pair the HUB master on the right.
How do you pair master headset to the hub?
(The second half of the video is show how to clear the hub)
Before joining the HUB, the number of remote headsets paired with the Master headset A must be less than the maximum number range of the master headset. (WAERO is equipped with a maximum of 2 remote headset, and KUMINIK8 is equipped with a maximum of 3 remote headset)
Note: The all remote headsets already paired with the master headset must be turned on , because after the master headset A enters the pairing, the remote headset which are not turned on will be cleared.
How to unpair/clear selective headsets from master/hub?
Turn off the remote headset to be cleared, then have the master headset enter the pairing state, and the remote headset will be cleared when the it cannot be detected.
How to unpair/clear all headsets from master/hub?
Video instructions on how to clear the left of the hub will be the same for the right side.
Please Note:
1. The master headset must be equipped with all remote headset and remote headset can be used (WAERO can be equipped with a maximum of 3 remote headset, and KUMINIK8 can be equipped with a maximum of 4 remote headset). HUB does not need to be fully configured.
2. If the master headset is fully equipped with remote headset, at least one remote headset must be turned off before operation can be performed
Method: Immediately press the middle switch button 7 times after the master headset enters the pairing state, and it will start to clear. HUB master enter pairing respectively, press 7 times in quick succession.
How to divide 9 pcs kits into 2 groups and use them?
Clear the pairing from the Master headset A to the HUB remote. (The second half of the video is show how to clear)
How to determine the remote headset belongs to which master headset for 9 pcs kit?
1. Judging by the A/B/C/D/E/F/G/H/I label on the headset (the pairing relationship at the factory, see the picture)
2. The remote headset connected to the HUB is judged by the light (see video below).
3. Turn off the HUB to see which remote headset can communicate with the master and judge the remote that belongs to master A.
How do you get optimal reception?
For optimal reception, the master headset and hub should be in the middle of all of the remote headsets.
What do you do when a remote headset is disconnected?
First you need to determine what the remote headset was connected to. reference: How to determine the remote headset belongs to which master headset for 9 pcs kit?
Then connect the remote headset to the corresponding master headset or hub.
Special case: The HUB remote headset is connected to the HUB master headset by itself, resulting in a disconnection and splitting into two groups. That is, only the HUB is turned on, so when the headsets are turned off, there is still a light display connection on the HUB Master headset.
Operation method:
The HUB Master headset forcibly clears the self-connected remote (see the video), and then re-pair the HUB and Master headset A.
How can I distinguish between the Master and Remote units of WAERO Pro?
You can tell them apart by the color of the headband. The master unit headband is Red, while the Remote unit is Blue.
What is the Waero Pro's battery life?
The Master unit lasts for 4 to 8 hours, and the Remote unit lasts for 15 hours. However, the more Remote units that are paired with the Master, the faster the Master's battery will drain. To address this, we provide replacement battery for free or you can use a type-c charging headsets.
What is the function of the MF button on the Waero Pro headset?
On the Master unit, the MF button allows you to enter broadcast mode, enabling temporary communication with all members. Releasing the button will return you to the original group. To maintain broadcast mode, you must hold the button continuously. On the Remote unit, the MF button does not have this function. However, pressing and holding the MF button on the remote controller will give a voice prompt indicating whether it is in Group A or Group B.
How do I divide WAERO PRO into A/B groups?
Check the color of the function indicator light to determine whether the device is in Group A (red) or Group B (blue).
Hold down button A/+ or button B/- until the voice prompt sounds to quickly switch to the other group. Only members within the same group can communicate with each other.
Does the WAERO PRO have noise-cancellation capabilities?
Yes, we use microphone environmental noise cancellation and AEC (Acoustic Echo Cancellation) noise reduction technology.
What is the function of the two CAME-NANO Remote units in the WAERO Pro 16-piece set?
The CAME-NANO is essentially a wireless intercom system that allows for listening and speaking. In the WAERO Pro 16-piece set, however, it serves as a bridge to connect two WAERO Pro 8-piece sets, losing its communication function. All 16 headsets in this set can communicate with each other.
What’s the difference between the Kuminik8 single ear headset and the Waero pro headset?
- The Kuminik8 master headset can connect to a maximum of 4 remote headsets without the hub. In contrast, the Waero Pro master headset can connect to up to 8 remote headsets without the hub.
- The Kuminik8 single ear headset is larger in size, and its ear cups provide a superior audio isolation experience. In contrast, the Waero Pro is designed to be portable and lightweight.
- The Kuminik8 doesn’t offer A/B grouping or One-Touch Broadcast—Waero Pro has both. The new A/B grouping covers more scenarios, and the Waero Pro master unit’s one-touch broadcast makes call management effortless.
I already had the 5-pack Kuminik8 headsets, can they work together with the Waero Pro to be a new 9-pack kit?
Kindly note that the Kuminik8 master headset is not compatible with the Waero Pro remote headsets. But the Waero Pro master headset is compatible with the Kuminik8 remote headsets.
If you already own the 5-pack Kuminik8, simply add one Waero Pro master and four Waero Pro remotes, you’ll end up with a 9-headset setup. Just note the original Kuminik8 master will no longer be needed.
Can WAERO-PRO be added to existing KUMINIK8 systems?
The Kuminik8 master headset cannot pair with Waero Pro Remote headset. However, Waero Pro master can pair with Kuminik8 remote headset.
What’s the maximum number of connections of Waero Pro?
We recommended no more than 16 users.
Is frequency adjustment available on Waero Pro?
No. Waero pro features a frequency hopping function, once it is turned on, the master will automatically choose the best frequency to use.
Can I use USB-C charging for continuous operation on Waero Pro?
Yes. For extended power supply via Type-C, it's recommended to remove the battery and use direct charging. For short-term emergency use, Type-C charging with the battery connected is acceptable.
What battery model does Waero Pro use, and is it identical to the Kuminik8's battery?
Both the Waero-Pro and Kuminik8 models utilize the universal Canon NB-6L battery, readily available for local purchase.