IMPORTANT DISCLAIMER: Included in this document are steps that are intended to return the CAME-Prophet gimbal that were programmed with firmware version 2.63 b0 back to its default factory settings. Please follow instructions carefully & perform at your own risk.
And DO NOT share this document with any other CAME-TV gimbal users and DO NOT perform any steps NOT directly recommended by CAME-TV personnel.
THINGS TO CHECK:
- Make sure Prophet battery is fully charged
- Perform this procedure using with the Prophet gimbal mounted upright on the single-handed grip. Do NOT perform while inverted on the Orbit ring or any other mounting accessory.
- Make sure the camera & lens setup is within the 6.6 lbs (3 kg) payload and perfectly balanced on the gimbal.
- Make sure you are using a Mini USB cable that is capable of data transfers (ex: the type used for hard drives. Cheaper cables used primarily to charge smartphones likely will not work)
1. FAMILIARIZE YOURSELF WITH THE SIMPLEBGC SOFTWARE - Before starting, please review the following articles so that you're further educated on the software tuning process and the dangers of making certain tuning adjustments (without our guidance).
How Do I Download, Install, and Launch SimpleBGC Software on MAC OSX or Windows?
What to do when SimpleBGC tells you to upgrade your firmware.
How do I know what SimpleBGC software version to use?
Once you're ready to move forward, first please make sure that you are using SimpleBGC version 2.63 b0.
2. SAVE YOUR PROFILES BEFORE STARTING - Once you've successfully connected to the SimpleBGC software, please save your current profiles as they are. This may be useful if you need to revert to them, or if further analysis needs to be done.
3. RESTORE YOUR PROPHET GIMBAL - Once you have your profiles saved, carefully follow the steps below to restore your Prophet gimbal back to its default settings.
A. LOAD THE DEFAULT RESTORATION FILE: As you get started, make sure your camera is perfectly balanced on the gimbal (upright on single handle) and powered off. Follow the steps shown in the video below to load the Prophet's default EEPROM file onto its control board. This file contains settings that serve as a setting point for general functionality. Save this file to your computer and use it in following the video below.
After the file has been successfully loaded, close out the window, and click WRITE to save your changes to the board. You can now power the gimbal on. At this point, the gimbal may shake (which is normal), so we suggest that you click the Motors On/Off button to temporarily disable to motors while keeping the gimbal powered on.

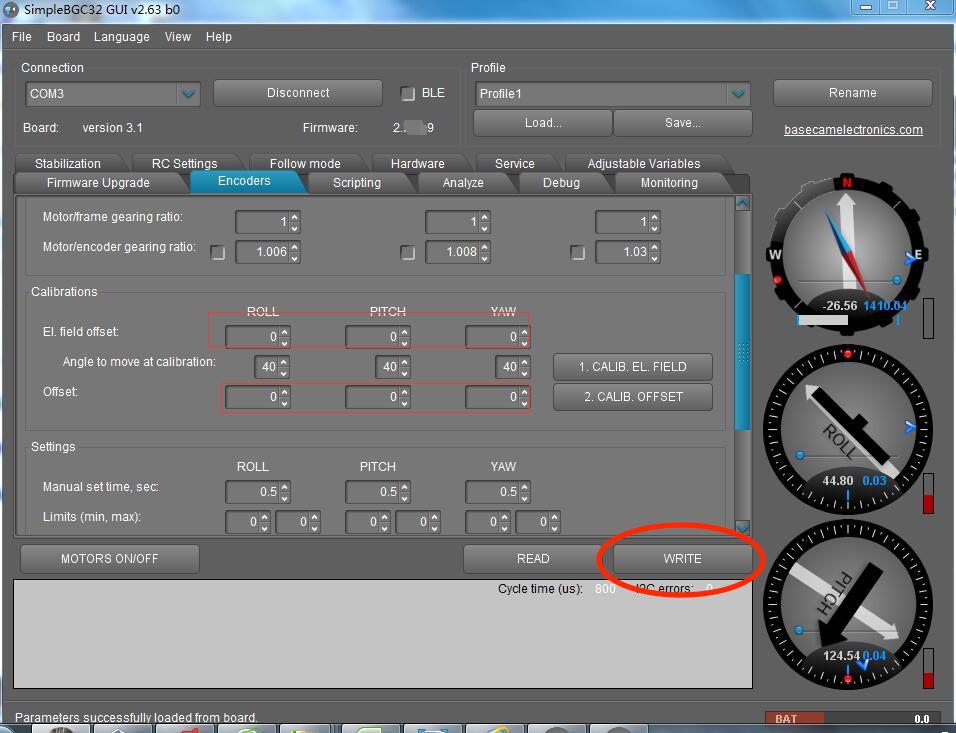
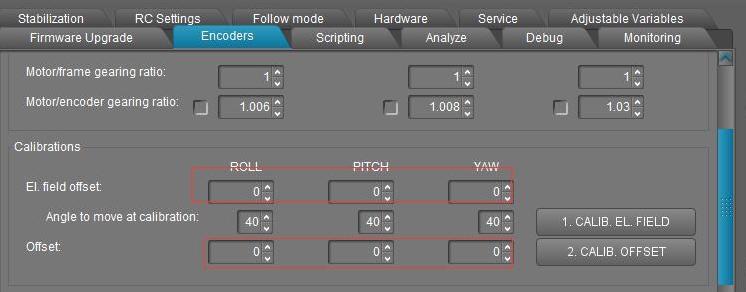
B. ZERO OUT ENCODER SETTINGS: You will soon be re-calibrating your encoders. But before doing so, go to the Encoders tab and manually type 0 in the fields shown in the image below. Once this is done for all the appropriate fields, click WRITE on the bottom right of the screen to save your changes.
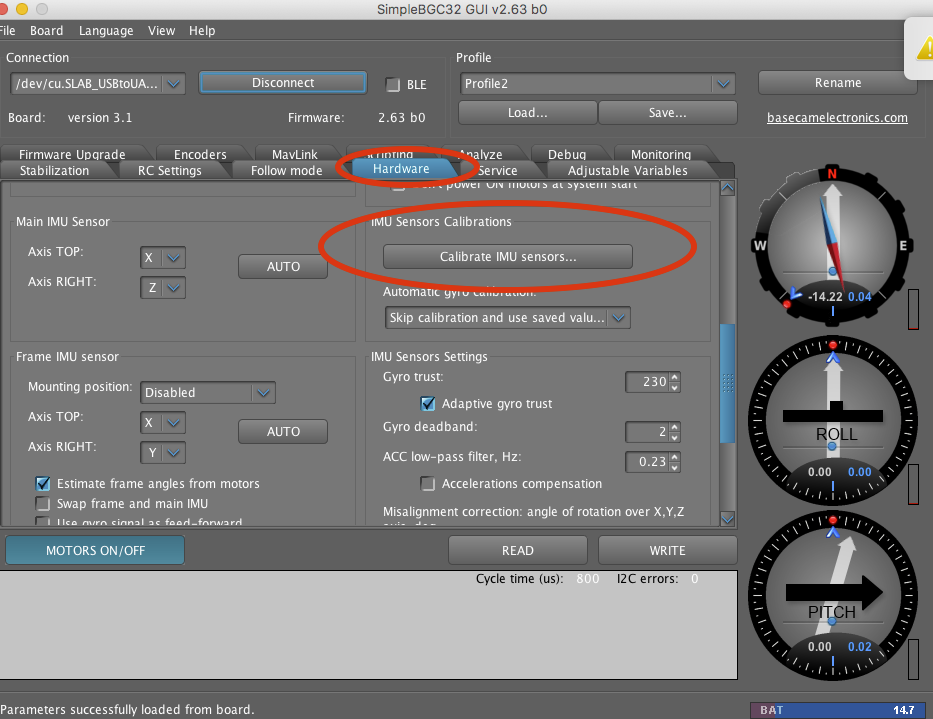
C. 6-POINT SENSOR & GYRO CALIBRATION Next, you will want to perform a 6-point calibration of your sensors. With the motors still off, go to the Hardware tab and click "Calibrate IMU sensors."
At this point, follow the steps shown below to perform a full 6-point sensor and gyro calibration.
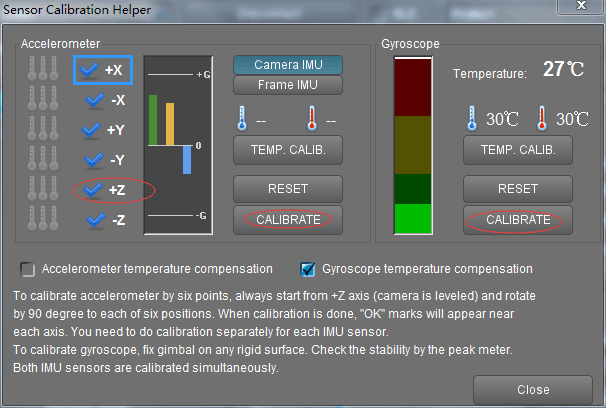
After completing the 6-point calibration, calibrate the Gyroscope (for Camera IMU only), and then close the window and click WRITE to save.
D. MOTOR INVERT DETECTION PROCESS: After completing the 6-point calibration, you will want to perform the motor invert process. Use the video below as a guide on how and why this is performed. You will want to turn your Motors back on to commence this process.
In the video, you may have noticed that both the gimbal and software interface differ from yours. Again, only use the video as a guide to perform the procedure, and do NOT copy the exact values/results onto your parameters. Since you are using a Prophet gimbal with SimpleBGC 2.63 b0, your software interface should look as it does below. The motor invert section can be found under the Hardware tab.
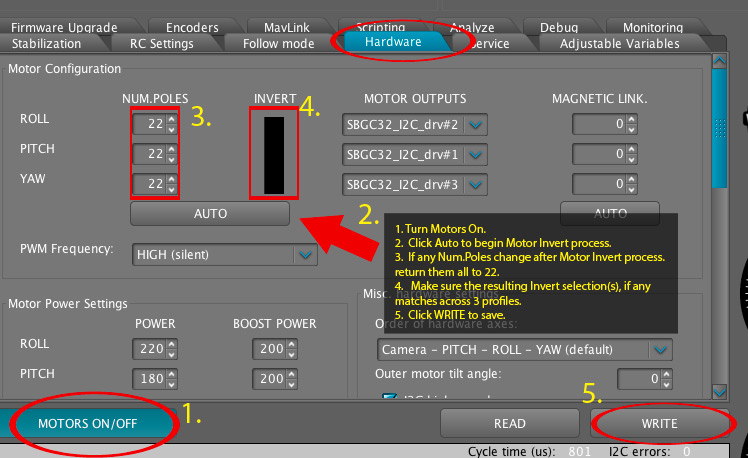
1. Make sure motors are On.
2. Click Auto to begin Motor Invert process.
3. If any Num.Poles change after Motor Invert process, return them all to 22.
4. Make sure the resulting Invert selection(s), if any, matches across 3 profiles.
5. Click WRITE to save.
D. ENCODER CALIBRATION After performing the motor invert procedure, you will want to perform an Encoder calibration. Go to the Encoders tab and make sure that the parameters that you zero'd out earlier are still set to zero.
From there, carefully follow the steps shown in the video below to calibrate your encoders.
IMPORTANT NOTE: The video above shows the Encoder calibration procedure shown with a CAME-Optimus and with a different version of the SimpleBGC software. Though the software interface looks different (because it's an older version), the procedure is the same. And more importantly, since an Optimus is used in the demo video, the values will NOT match the values generated with your Prophet. Do NOT copy the values shown in the video onto your parameters. Simply follow the procedure as shown in the video and the encoder calibration process will generate values that are unique to your Prophet.
Once the encoder calibration has been completed, your Prophet gimbal should be fully restored and functional. If for any reason it does not seem to function correctly, please repeat this restoration process to make sure you did not miss any steps.
But if it has been restored, we strongly suggest that you again save your profiles so that you have a backup of them on hand if you need them.


