If you have connected your gimbal via USB, you may need to install the proper driver for your Mac or PC to communicate with the control board which can be found Here>>.
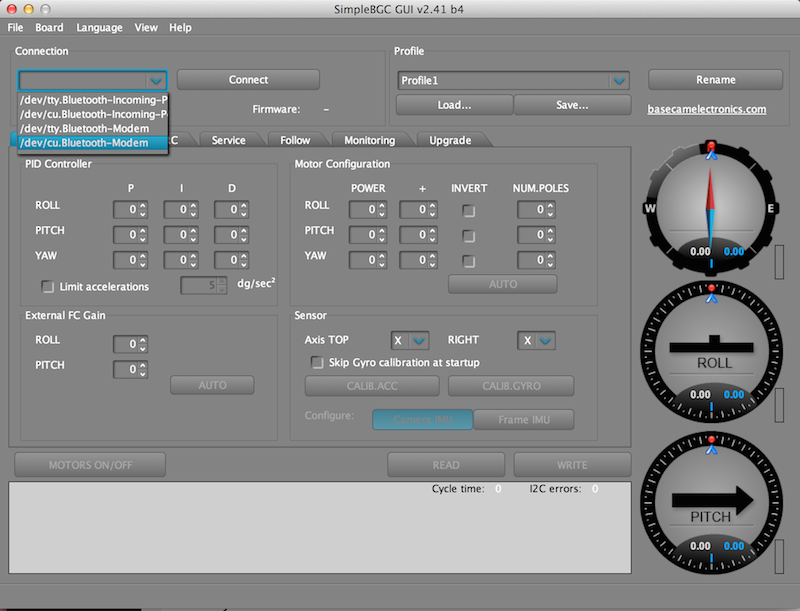
Once you have installed the proper Mac or PC driver and restarted your computer, connect the gimbal, go into the SimpleBGC software, and on the upper left, select the proper USB port, and hit 'Connect'.
If you still do not see the gimbal or if you already have the proper drivers for your computer, please check your USB cable to make sure it is a Data cable. We suggest either testing the cable or just change the cable entirely to make sure it is not an issue.
Make sure the cable is fully connected to the gimbal and your computer, then restart the SimpleSBC program.
Encoders are often used in Robotics for highly accurate monitoring of motor position. Some of the benefits of using Encoders are to: prevent motors from losing synchronization and skipping steps, provides important information about frame and camera angles, decreases power consumption (longer battery life), increases Torque, increases precision of stabilization, and more.
Currently our only gimbal with motor encoders is our CAME-Single.
Currently the only gimbal that has the motor encoders is the CAME-Single. We may start to implement these encoders onto newer versions of our gimbals in the future.
The following PDF document has been provided to explain instructions on modifying the Follow Modes on your CAME-TV 7800 Gimbal. These instructions are similar for other Gimbal Models as well.
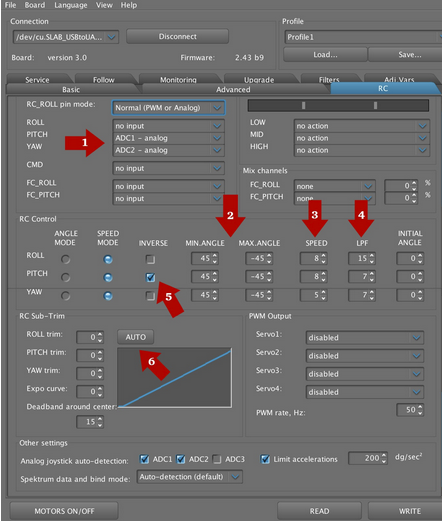
NOTE: The values above are shown as a sample only and may not pertain to your gimbal's unique RC settings. Do NOT copy them!
RC Options Explained
1.. The Joystick on the CAME-TV is a 2-Axis Joystick. This means it can control movements from either Pitch, Roll, and YAW. The default setting controls Pitch (tilt up | down) and Yaw (pan left | right). If you want to change these settings to control the ROLL of the camera, you can do this here.
2. The MIN ANGLE and MAX ANGLE is used to control the maximum allowed camera position when using the Joystick. The camera will automatically stop according to these angles. We recommend using -45 and +45 degrees. If you feel you want to control more or less camera angle through the Joystick, you can make the changes here.
3. Speed is how fast the camera movement is when the Joystick is used. A higher Value will cause the camera to move quickly when the Joystick is applied. A lower value will allow the camera to move slowly. If you want to change the speed of your camera movement when using the Joystick, you can make the changes here.
4. LPF is used to control the responsiveness of the Joystick controls.
HIGHER LPF VALUE will delay the camera movements after the Joystick is applied. The camera will also take longer to come to a complete stop after Joystick. It will basically ‘ramp up speed’ during the start of camera movement and ‘ramp down speed’ at the end of camera movement.
LOWER LPF VALUE will have immediate camera response. The camera will move immediately when the Joystick is applied, and will come to a sudden stop after Joystick application. This causes a ‘jerky motion’ which does not appear smooth, but is better for tracking very fast subjects.
5. INVERSE is used to change the direction of Joystick Controls. This is used because Joysticks can be mounted in different positions. If you move the Joystick Up and your Camera camera points down, you can change this with the Invert Option for Pitch (Tilt). After making this change, when you point your Joystick Up the Camera will point Up (instead of down).
TIP: If you apply Joystick UP and the camera pans Left or Right, and when you apply
Joystick Left the camera Tilts Up, then you can swap these controls under the first setting (see Arrow 1).
6. The RC Sub-Trim is used to calibrate the Joystick. This is an electro-mechanical control surface that over time may need calibration for it’s true Neutral Position. The most common problem is slow ‘drifting’ of camera position. When the Joystick is not calibrated properly, the gimbal believes that someone is applying Joystick commands and starts to move. To calibrate your Joystick, ensure that your Joystick is in it’s true neutral position. Make sure it’s not binding or stuck, and is centered as best possible. Then simply click on the Auto button and the values will automatically be entered. Or you can try to change these values manually to correct drift issues.
Save the Settings by clicking the WRITEButton after you’ve made the changes.
If you need additional information, this video by MrCheesycam explains more about the RC Tab and various settings.
If your Gimbal is Beeping more than 15 times and continues non-stop, this could be a Low Battery Warning. If the beeping stops after about 13-14 beeps, this could be a Calibration Process (see here).
If the beeping does not stop, try to charge the battery for several hours and then try again.
If you feel you have left your battery charging long enough and are still having continuous beeping, you may either have a bad battery (not holding correct voltage) or possibly a bad Battery Charger.
Try another battery, or try another battery charger with your existing battery.
If your gimbal beeps several several times (approximately 13 times) whenever you restart the system, this could be a Calibration Mode. If it continues to beep non-stop, this most likely is a Low Battery Warning (see here).
When your Gimbal is going through a Calibration process it is important to have the entire gimbal level, hold the camera level, and also hold the gimbal frame square and centered. Once it is done calibrating, the gimbal should hold the camera position. If you allow the calibration to process while the gimbal or camera is not level, the calibration will be set to whatever position you allowed it to process.
We suggest disabling this feature and to only perform Calibration Manually when needed. To disable the Calibration process each time you restart, connect to the software and select the option 'Skip Calibration on Startup' under the Basic Tab.
Make sure to click on the Write Button to save your settings. Now each time you startup, the Gimbal will boot up immediately.
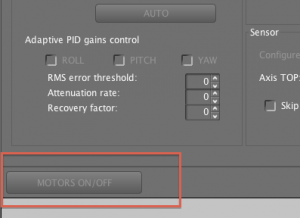
When connecting the Gimbal via USB to the software, sometimes you may find the motors do not operate when you power the entire system On. The problem may be a setting in the software that temporarily disables the Motors. This setting is used when you are working on the gimbal, and need to change settings without powering the system off or disconnecting.
To turn the motors back on, click on the Motors ON/OFF Button located at the lower left of the SimpleBGC Application Screen.
If your system is powered on and connected to the Software, this button will toggle power to the Motors On or OFF.
This video by MrCheesycam will show you how to perform Quick Basic Sensor and Frame Calibrations with your on CAME-TV Gimbal. It will also show you how to add the Service Mode 4 & 5 to your system so that you can perform future Calibrations without a computer.
Calibrating your Sensors can often fix small issues such as camera drifting, unlevel camera position, uneven frame positions, and overall stability. Many CAME-TV Gimbals allow you to switch to Inverted Mode by first powering off the Gimbal, inverting the gimbal frame, and then restarting the system. The gimbal will auto detect inverted mode.
Whenever inverting your Gimbal or using it in normal mode, it can be helpful to re-calibrate your sensors when switching positions. By using Service Mode 4 and Service Mode 5 after starting your system, you can calibrate your camera position and it will assist for more stable performance.
 Adjust Follow Modes and Speed for Follow Modes on CAME-TV Gimbal - Google Docs