CAME-7000

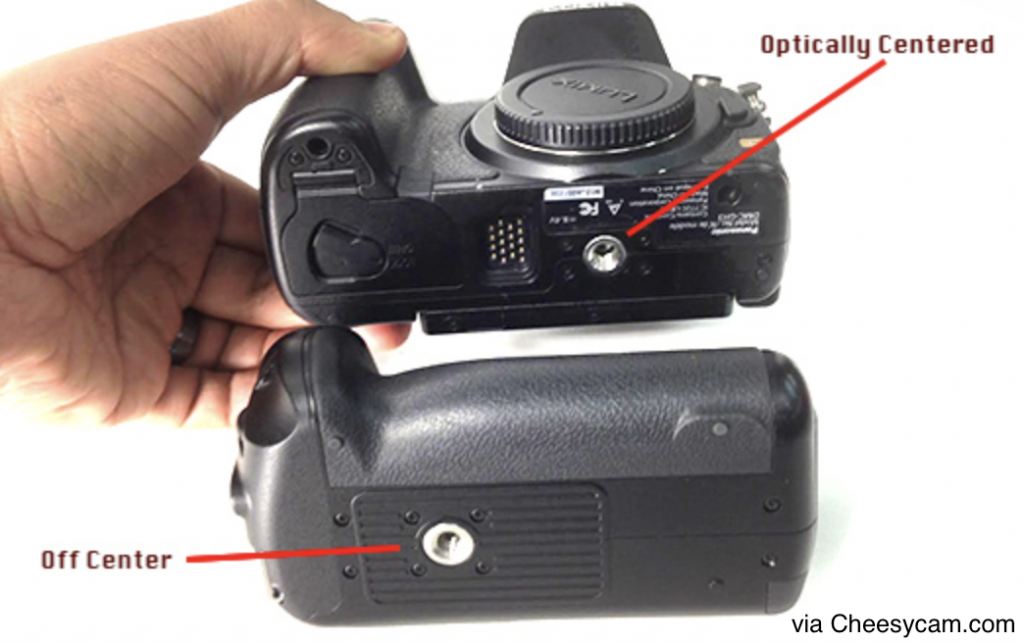
Most cameras are designed with its tripod mounting hole positioned perfectly center along the bottom/base of the camera body.  However, there are a few cameras that have been designed with the mounting hole off-center, making it difficult to balance onto most gimbals.  (See below)

tripod mount positions

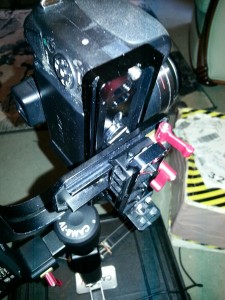
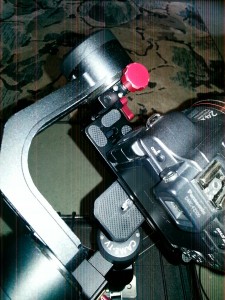
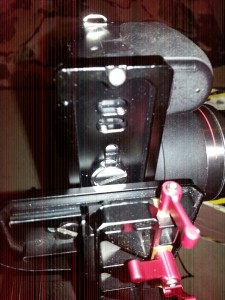
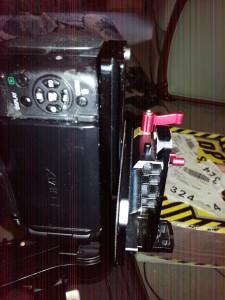
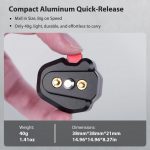
However, one useful solution to this problem is to use a PU-150 Benro/Arca Swiss style QR plate as an extension adapter plate to add more flexibility to your balancing options.

Below you can see some samples provided by customer Ray Roscoe in using the extender plate along with his camera while balancing it onto the CAME-Optimus gimbal. (Click images to enlarge)

20180227_161403_resized . 20180227_161415_resized

20180227_161428_resized . 20180227_161441_resized

Notes from user Ray Roscoe:
1. Remove the center stop screw so the camera can slide just that bit further.
2. There are 2 small allen screw sin the plate, one needs to be removed tow enable the extension plate a little more movement.

If you're in the market for a used gimbal, particularly from a private, non-commercial seller (ex: eBay),  there are several tips/precautions we advise before deciding to make the purchase.

1.  Contact the seller and ask for detailed pictures of their actual gimbal, not a promotional photo.  If there are any physical flaws on the gimbal (ex; scratches), it is best that you are made aware before making the purchase.

2.  Ask the seller to provide you with a current video showing the gimbal's working status.  It is common for users to make DIY modifications to the gimbal's physical state, or even alter the control board's programming (ex: to make joystick speeds faster).  Ask the seller if they've ever modified the gimbal in any way, or if it is experiencing any functionality problems.

3.  Secondhand/used purchases are NOT covered by our standard warranty.

4.  If the used gimbal you are interested in is an older model and is no longer available on our website, then contact CAME-TV to make sure they still have parts available for that particular gimbal.

We must first note that all CAME-TV gimbals are pre-programmed and quality-tested to function right out of the box. No additional software tuning or firmware upgrades should be necessary. However, if you would like to make minor tuning adjustments with the SimpleBGC software at your own accord- such as changing joystick speeds, decreasing motor power, etc. - we suggest that you first SAVE the gimbal's default, factory-programmed settings before making such changes.

Should something go wrong as you're making the changes, you can always revert back and load the original default profiles. And please note that the profiles that you save contain settings that are unique to your gimbal. Sharing these profiles with other gimbal owners is not advised and can make their gimbal inoperable.

And perhaps most importantly, under no circumstances do we advise upgrading your firmware. Doing so will wipe your settings and make your gimbal inoperable. The only way to potentially make it functional again would be to send it back to a CAME-TV support facility for repair (at your own cost if out of warranty).

[IMPORTANT NOTE:] Your saved Default Profile is configured to the default Firmware installed on your Gimbal. If you attempt to upgrade your firmware, the saved Default Profile will no longer be valid.

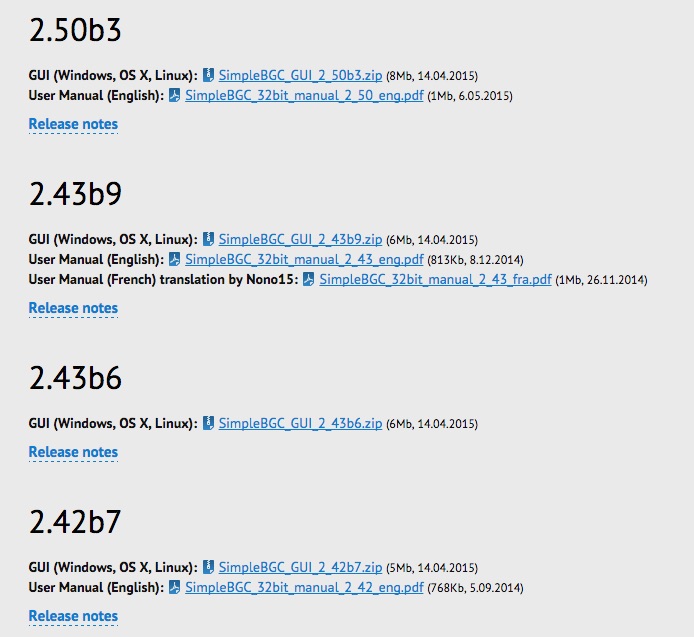
Below is a list of authorized versions of the SimpleBGC GUI software to use with our CAME-TV gimbals. Instructions for connection and use can be found here. If you are unsure of which version below is appropriate for your gimbal, click HERE.

2.63 b0 Currently available for the CAME-Prophet gimbal only. Contact us if needed.

2.60 b4 Currently available for CAME-Prodigy and newer CAME-Optimus models only. Contact us if needed.

2.56 b7
GUI (Windows, OS X, Linux): SimpleBGC_GUI_2_56b7.zip (8Mb 20.01.2016)
User Manual (English): SimpleBGC_32bit_manual_2_5x_eng.pdf (1Mb 29.06.2016)

2.55b3
GUI (Windows, OS X, Linux): SimpleBGC_GUI_2_55b3.zip (7.95Mb 17.02.2015)

2.50b3
GUI (Windows, OS X, Linux): SimpleBGC_GUI_2_50b3.zip (8Mb 14.04.2015)
User Manual (English): SimpleBGC_32bit_manual_2_50_eng.pdf (1Mb 6.05.2015)

2.43b9
GUI (Windows, OS X, Linux): SimpleBGC_GUI_2_43b9.zip (6Mb 14.04.2015)
User Manual (English): SimpleBGC_32bit_manual_2_43_eng.pdf (813Kb 8.12.2014)

If you are in need of 2.60 b4, contact us first.

SimpleBGC GUI software is developed and provided by BasecamElectronics.com.

In general, yes we do sell most spare parts for many (but not all) of our CAME-TV products. For example, if you are in need of parts such as a replacement QR plate for your CAME-TV gimbal, or a spare power adapter for your LED light, then fill out this form and one of our associates will contact you to let you know if your requested part is available for purchase.

Instead of sending a video link as requested on the form, you can send a link to an image for the part that you are in need of. If you are requesting a part that you've lost and cannot take a picture of it to send. Then you can go to that item's product page on our website, download a picture, and simply highlight or circle the specific part that you are in need of. Once you have the image ready, create a shareable link (ex: via imgur, Dropbox) out of it and include it when emailing our technical support staff.

If you are already in contact with a CAME-TV support associate regarding a problem or concern with your product, then we recommend sending videos in 1 of the 4 ways listed below. In the video itself, you can simply shoot it with your smartphone and through your POV (or while mounted on a tripod). It is easiest for us to diagnose and troubleshoot a problem remotely if we see exactly what you see.

(Ex: If you are reporting a problem with a shaking gimbal, shoot the video so we see the gimbal in the shot. Do not send a video from the gimbal camera's point of view).

1. Unlisted YouTube Video - Please upload a video to YouTube, save it as Unlisted and then send us the link.

2.  DropBox shareable link - Simply upload the video to your DropBox account and provide us with a shareable link.

3. Vimeo Link (Password Protected) - If you have a Vimeo account, you can upload the video and encrypt it with a password for external viewing. You can then send us the video link along with the password that unlocks the viewing restrictions so we can view it on our end.

4. WeTransfer.com Digi-Delivery - If you do not own or have access to any of the accounts listed above, then you can send us your movies for free using WeTransfer.com. You can send multiple files up to 2GB per email for free and no account or membership is needed.

NOTES:

Why do I need to send a video for support?

- First and foremost, by giving our technical staff a first hand look at the issue that you are reporting, they may be able to recognize the problem more easily and in turn provide a timely solution.

- In the past, there have been incidents where customers have presented false claims of product malfunction/defect in order to receive a replacement for their product (which in truth was not defective). Providing a video is a way to show us and confirm that there indeed a manufacturing flaw with an item that is in need of support and/or repair.

Can I just send the video as an email attachment?

- We'd prefer that you DO NOT send videos through email attachments for several reasons.

1) Our support team uses a 3rd party email ticketing/organization system that limits all attachments to only 7mb. Most videos usually are larger in file size and will not be transmitted successfully.

2) Our email software is very sensitive in its security features, and at its discretion, will put suspicious emails with attachments into a spam/junk mail folder, which we likely will not be able to immediately see.

A few common questions that we receive from customers regarding our gimbals are (A) Does my camera & lens combo work? and (B) What is the gimbal's maximum payload?

Though this information can be found on all of our gimbals' respective product pages, below you will see a quick index showing the appropriate camera types along with the maximum payloads that each gimbal is designed to support.

CAME-Prophet
Cameras supported - Medium-sized DSLR cameras, including Canon 5D/7D Series, Panasonic GH4, Sony A7r/A7s series, etc.
Maximum Payload (including lens & accessories): 6.6 lbs / 3 kg

CAME-8000
Cameras supported - Larger camera setups, including BMCC, CANON C100/C300, RED EPIC, CANON 5D Series/7D Series, etc.
Maximum Payload (including lens & accessories): 11 lbs / 4.9 kg

CAME-TV Prodigy
Cameras supported -Larger camera setups, including SONY FS7, BlackMagic Design URSA MINI, RED RAVEN, RED EPIC, CANON C100/C300, CANON 5D Series / 7D Series, etc.
Maximum Payload (including lens & accessories): 15lbs / 7kg.

CAME-7500/7800/ARGO
Cameras supported - Medium-sized DSLR cameras, including Canon 5D/7D Series, Panasonic GH4, Sony A7r/A7s series, etc.
Maximum Payload (including lens & accessories): 6.6 lbs / 3.0 kg

Mini 3
Cameras supported - Smaller to medium-sized DSLR and mirrorless cameras, including BMPCC, Panasonic GH4, Sony A7r/A7s series, etc. with lighter lenses.
Maximum Payload (including lens & accessories): 2.6 lbs / 1.2 kg
Note regarding lens adapters: We strongly suggest that only native lenses be combined with your cameras while being mounted on these gimbals. Lens adapters such as metabones will add excess weight to the setup (plus usually attached to heavier lenses), which will exceed the max payload, and prevent your gimbal from balancing properly.

CAME-Mini 1, Mini 2, Single, Optimus,
Cameras supported - Small mirrorless cameras, including BMPCC, Panasonic GH4/GH5, Sony A7r/A7s series, a6300, etc. with lighter lenses.
Maximum Payload (including lens & accessories): 2.6 lbs / 1.2 kg
Note regarding lens adapters: We strongly suggest that only native lenses be combined with your cameras while being mounted on these gimbals. Lens adapters such as metabones will add excess weight to the setup (plus usually attached to heavier lenses), which will exceed the max payload, and prevent your gimbal from balancing properly

View CAME-TV's entire line of gimbals here.
Just going to put this out there right now... DO NOT UPGRADE YOUR FIRMWARE, no matter what the SimpleBGC GUI screen tells you. Doing so will completely wipe out your board and can potentially cause irreversible malfunction to your gimbal. And even worse, this course of events runs you the risk of voiding your warranty.

If you are attempting to connect to the SimpleBGC software for the first time, and you receive a pop-up message telling you that you should upgrade your firmware because of a "board vs. GUI mismatch" (as seen below), then it's best that you simply use a different version of the software, rather than upgrade your firmware. When this happens, simply disconnect and then quit out of the current SimpleBGC that you are using and then download the software version that is closest to the firmware version that the pop-up message is recommending.

simplebgc_firmware_screen

So in the case shown above, we connected our gimbal to SimpleBGC GUI version 2.43 b9. However, the gimbal's internal control board has been programmed with a software version using firmware 2.50 b2, which is obviously higher than the GUI software that we are attempting to use (v2.43 b9). So as stated earlier, disconnect & quit out of the 2.43 b9 software, and then download and launch the version of the SimpleBGC GUI that is closest in number to the recommended firmware, which in this case would be 2.50 b3.

simplebgc_gui_versions

You should be able to connect successfully this time around with your settings completely intact.

More SimpleBGC tips can be found here.

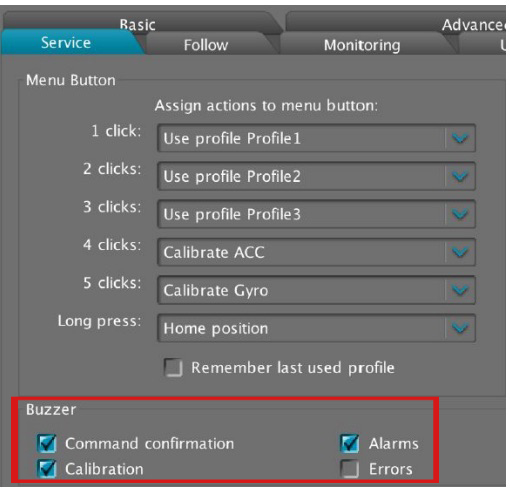
The sounds built into the gimbal serve several key functions - notifying you 1) when your gimbal is powered up, 2) when you've successfully switched profiles, 3) when your battery is running out, or 4) when it senses a general error within the system.

However, when you're right in the middle of a production, there are moments when silence is absolutely necessary - such as a wedding, a film/tv scene with recorded audio, etc. For these situations, it may be necessary to temporarily deactivate (or mute) the sounds coming from your gimbal. Simply connect to the SimpleBGC software, and then go into the Service tab and select which sounds you want to turn off.

You can always re-activate the audio alerts whenever you feel the need to.
service_audio1

Your card is formatted, talent's in place, and your gimbal is perfectly balanced. And just as you're about to roll camera.... your gimbal's battery dies. But wait? You charged your battery overnight, right? Even so, batteries, just like most things that involve power, have a shelf life.

The best way to avoid this nightmarish scenario is to test your batteries on a regular basis using a voltmeter/multitester. Among the many things it's capable of, a multitester can read the voltage of your battery and let you know if it has enough juice in it to perform. And just as easily, it can let you know if the battery is ready to be replaced.

If you don't own or readily have access to a voltmeter or multitester, then you can bring your battery(ies) into most electronics/repair shops or automotive garages. Most of these businesses will test your batteries for free.

Check multitester prices here.

Initially, you can download any version of the SimpleBGC software to connect to your gimbal. After your first successful connection, look at the version of the firmware on the screen (shown in green below). 

simplebgu_firmware_

Once you have verified the firmware version, you can go back and download the correct GUI version to match your firmware.

Typically, you will want the the software version whose number is equal or lower than the firmware version. For example, in the example above, since your gimbal has been programmed with a 2.56 b9 firmware, you will want to find a SimpleBGC software version that is equal or slightly lower than 2.56 b9. In this case, the closest software version available is 2.56 b7. You should always use the same GUI when configuring your gimbal. And most importantly, NEVER upgrade your firmware!!!

Download link for the SimpleBGC GUI software can be found here.

In order to get smooth, steady shots with any of our CAME-TV gimbals, you want to make sure that your camera is properly balanced on them. However, sometimes our customers are so eager to put their new gimbal to use, that they don't take the time balance it accurately.

If you are reading this article, then chances are that you already have, or are in the process of balancing your gimbal. The video below, we will show you a very quick and easy test that will let you know if you've done so correctly.

For full, step-by-step instructions how to balance your gimbal, check out these useful videos produced by reviewer MrCheesycam. CAME-TV 7800 CAME-TV MINI CAME-TV MINI 2, Single

All CAME-TV gimbals have been designed to support numerous camera/lens setups. That is, as long as the overall payload does not exceed that particular gimbal's pre-determined weight capacity. However, it is also possible for a camera setup to be too light. When this happens, users may notice shaking, vibrating, and even noises coming from the motor of their gimbal. But don't panic!! Essentially, the gimbal's motors have been programmed to expect a slightly heavier payload and are just working a little bit harder than they have to.

A quick fix to this problem, would be simply to lower the Motor Power in the SimpleBGC software. But first, before making any changes, we advise archiving all of your current settings (ex: saving your profile or capturing screenshots). In the unlikely event that you may have to revert back to those values, you'll at least have your screenshots for reference. Once that's done, investigate the gimbal and find out which motor (Yaw, Pitch, or Roll) is giving you problems. Once you have determined the culprit, connect to the software and reduce the Motor Power settings accordingly. Step by step details can be found in the video below.

NOTE: For heavier camera setups, simply increase motor power settings instead of decreasing them.

During this motor power adjustment process, it is ok to turn on your gimbal and test functionality after applying changes. Please know that this is a trial & error process and it may take some time to find the perfect settings for your camera setup. And just as a reminder, once you're able to determine the correct settings in one profile to stabilize your gimbal, apply those settings to the remaining 2 profiles in the Basic Tab of the software.

One of the more useful functions of any CAME-TV gimbal is the built-in joystick/remote control feature. Simply enough, the 2-axis joystick essentially allows you to do seemless panning and tilting movements while maintaining smooth and steady shots with the gimbal.

However, all gimbals come with a pre-programmed joystick speed that dictates how fast its movements are. And sometimes this default speed isn't ideal for the shot that you may want to execute. But luckily, speed can easily be adjusted using the SimpleBGC software. Full step-by-step details are shown in the video below.

Perhaps one of the more common questions we get from customers is "why is my gimbal drifting when it's powered on?." Obviously, a properly balanced and calibrated gimbal will stay put and only move when (and how) you want it to move.

A likely reason for the drifting is that the RC Sub-Trim settings may be off. The RC Sub-Trim is used to calibrate the Joystick. This is an electro-mechanical control surface that over time may need calibration for it’s true Neutral Position. The most common problem is slow ‘drifting’ of camera position. When the Joystick is not calibrated properly, the gimbal believes that someone is applying Joystick commands and starts to move. The video below will help you properly calibrate your joystick and thus likely eradicate the problem of drifting.

NOTE: If you're using a gimbal with an external wireless remote, then make sure the remote is turned on during this process.

NOTE:   After completing this process, if drifting persists on any 1 profile, but is no longer present on either of the 2 Profiles, then you can manually copy the RC subtrim values from the non-drifting profile onto the profile that does drift. In other words, after completing the Auto RC-Subtrim process, if Profile 3 still drifts, but Profile 1 & 2 remains still, then you can manually copy the RC-Subtrim settings from Profile 1 or 2 onto Profile 3. Drifting should then be eliminated from all 3 profiles as a result.

Download the SimpleBGC software here.