In order to get smooth, steady shots with any of our CAME-TV gimbals, you want to make sure that your camera is properly balanced on them. However, sometimes our customers are so eager to put their new gimbal to use, that they don't take the time balance it accurately.
If you are reading this article, then chances are that you already have, or are in the process of balancing your gimbal. The video below, we will show you a very quick and easy test that will let you know if you've done so correctly.
All CAME-TV gimbals have been designed to support numerous camera/lens setups. That is, as long as the overall payload does not exceed that particular gimbal's pre-determined weight capacity. However, it is also possible for a camera setup to be too light. When this happens, users may notice shaking, vibrating, and even noises coming from the motor of their gimbal. But don't panic!! Essentially, the gimbal's motors have been programmed to expect a slightly heavier payload and are just working a little bit harder than they have to.
A quick fix to this problem, would be simply to lower the Motor Power in the SimpleBGC software. But first, before making any changes, we advise archiving all of your current settings (ex: saving your profile or capturing screenshots). In the unlikely event that you may have to revert back to those values, you'll at least have your screenshots for reference. Once that's done, investigate the gimbal and find out which motor (Yaw, Pitch, or Roll) is giving you problems. Once you have determined the culprit, connect to the software and reduce the Motor Power settings accordingly. Step by step details can be found in the video below.
NOTE: For heavier camera setups, simply increase motor power settings instead of decreasing them.
During this motor power adjustment process, it is ok to turn on your gimbal and test functionality after applying changes. Please know that this is a trial & error process and it may take some time to find the perfect settings for your camera setup. And just as a reminder, once you're able to determine the correct settings in one profile to stabilize your gimbal, apply those settings to the remaining 2 profiles in the Basic Tab of the software.
One of the more useful functions of any CAME-TV gimbal is the built-in joystick/remote control feature. Simply enough, the 2-axis joystick essentially allows you to do seemless panning and tilting movements while maintaining smooth and steady shots with the gimbal.
However, all gimbals come with a pre-programmed joystick speed that dictates how fast its movements are. And sometimes this default speed isn't ideal for the shot that you may want to execute. But luckily, speed can easily be adjusted using the SimpleBGC software. Full step-by-step details are shown in the video below.
Perhaps one of the more common questions we get from customers is "why is my gimbal drifting when it's powered on?." Obviously, a properly balanced and calibrated gimbal will stay put and only move when (and how) you want it to move.
A likely reason for the drifting is that the RC Sub-Trim settings may be off. The RC Sub-Trim is used to calibrate the Joystick. This is an electro-mechanical control surface that over time may need calibration for it’s true Neutral Position. The most common problem is slow ‘drifting’ of camera position. When the Joystick is not calibrated properly, the gimbal believes that someone is applying Joystick commands and starts to move. The video below will help you properly calibrate your joystick and thus likely eradicate the problem of drifting.
NOTE: If you're using a gimbal with an external wireless remote, then make sure the remote is turned on during this process.
NOTE: After completing this process, if drifting persists on any 1 profile, but is no longer present on either of the 2 Profiles, then you can manually copy the RC subtrim values from the non-drifting profile onto the profile that does drift. In other words, after completing the Auto RC-Subtrim process, if Profile 3 still drifts, but Profile 1 & 2 remains still, then you can manually copy the RC-Subtrim settings from Profile 1 or 2 onto Profile 3. Drifting should then be eliminated from all 3 profiles as a result.
When you purchase a CAME-TV gimbal, chances are that it has been pre-programmed with 3 main profiles. And each profile contains its own unique set of follow modes, which you can toggle between depending on which mode you need to use.
Profile 1 will enable Follow Modes for both Pan and Tilt (Yaw and Pitch). Profile 2 will enable Follow Mode ONLY for Pan (Yaw) and will Disable Tilt (Pitch). Profile 3 will disable All Follow Modes. The Camera heading will stay constant.
However, in the event that these follow mode settings are unknowingly or mistakenly altered in the SimpleBGC software, you can manually restore them by dialing them in yourself.
Service Modes are used to assign button clicks to various gimbal operations. On most CAME-TV gimbals, you can toggle between these different modes simply by clicking on the service button (or joystick) to operate them. By default, the first three modes are set as follows:
1 Click: Switch to Profile 1 2 Clicks: Switch to Profile 2 3 Clicks: Switch to Profile 3
To see how Profiles 1, 2, and 3 are configured, click here.
It's also a good idea to take advantage of your Service Modes by using the Profile 4 and Profile 5 options. These profiles should specifically be set to calibrate your sensors and gyro, respectively. These modes will especially come in handy when you're shooting out in the field and don't have access to your laptop to recalibrate your gimbal.
4 Clicks: Calibrate ACC (Calibrate sensors. Must hold camera and gimbal level and square when using this option) 5 Clicks: Calibrate Gyro (Calibrate Gyros. Must hold camera and gimbal level and square when using this option)
SAMPLE: Once you have Profiles 4 & 5 programmed and saved, you can now calibrate your sensors and gyros directly through the gimbal. (Demonstrated in video below with a CAME-Single, but the process applies to all CAME-TV gimbals when calibration modes have been programmed in them.)
Gimbal calibration demonstrated on CAME-Single and CAME-7800 gimbals below. (Process applies to all gimbals with service modes programmed in).
https://www.youtube.com/watch?v=bH-h90_AdxU
https://youtu.be/IqzbfVAjQHQ
None of our gimbals currently come with a bluetooth module or support bluetooth connectivity with external mobile apps. Trying to install other third party modules into any CAME-TV gimbal may void your warranty.
Yes, the batteries 18650 batteries from the first CAME-MINI gimbal are the same for the CAME-MINI2. The main difference between the two gimbals are the addition of tool-less adjustments for balancing your camera. Otherwise they are very similar.
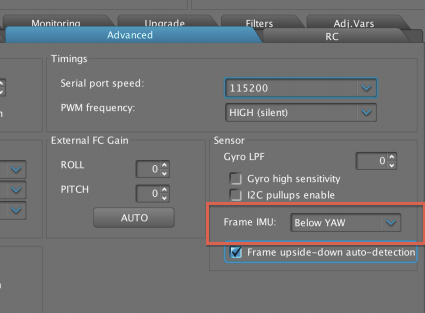
Gimbals can work with either one or two IMU sensors. One sensor is placed above the camera to track camera positions, and the second (optional) is typically mounted to the vertical frame post for tracking frame angles.
If you are using a Dual IMU system and cannot click on the Frame IMU button, it's possible this option has been disabled. Click over to the Advanced Tab and change the option for Frame IMU to Below YAW. Next Click the Write button to save your changes.
Now return to the Basic Tab and try to select the Frame IMU button for your options.
Brushless Motors can be wired to spin in clockwise or counterclockwise, and the software to control them can automatically change directions. Motors on Gimbals can also be mounted in many different ways, so the software needs to detect which way is the proper rotation for your setup. This is when you may need to use the Invert option under Motor Configuration.
IMAGE IS AN EXAMPLE. DO NOT COPY THESE INVERT OPTIONS DIRECTLY. FOLLOW INSTRUCTIONS BELOW.
Once you have your sensors setup correctly, follow the instructions in the video below to determine if any of your Motors require the Invert option selected for your Gimbal.
We understand that many people want to Tune their Gimbals for different characteristics. But instead of downloading and sharing profiles, Keep in mind that Profiles carry several settings that are unique to your system. Instead of downloading and installing complete Profiles just for PID settings, we suggest just changing your PID settings manually through the software. This way you don't affect other settings such as Motor Invert Options, RC Settings, Sensor Positions, Follow Modes, etc.
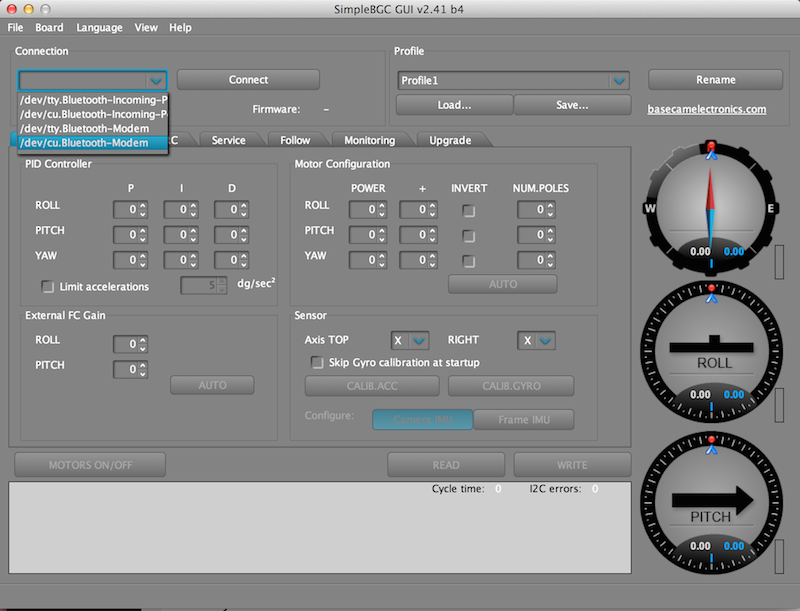
If you have connected your gimbal via USB, you may need to install the proper driver for your Mac or PC to communicate with the control board which can be found Here>>.
Once you have installed the proper Mac or PC driver and restarted your computer, connect the gimbal, go into the SimpleBGC software, and on the upper left, select the proper USB port, and hit 'Connect'.
If you still do not see the gimbal or if you already have the proper drivers for your computer, please check your USB cable to make sure it is a Data cable. We suggest either testing the cable or just change the cable entirely to make sure it is not an issue.
Make sure the cable is fully connected to the gimbal and your computer, then restart the SimpleSBC program.
Currently the only gimbal that has the motor encoders is the CAME-Single. We may start to implement these encoders onto newer versions of our gimbals in the future.
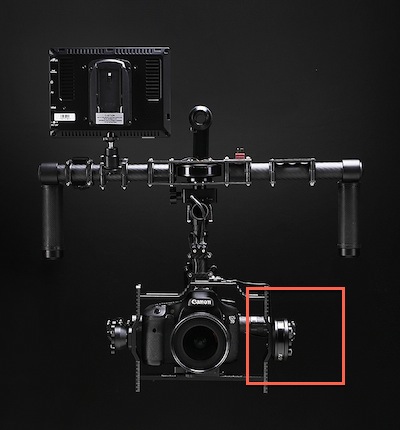
If you've received your gimbal, balanced your camera, and find the system works perfectly when panning Left or Right, but is not stable when Tilting Up or Down, double check if you've mounted the Camera Frame in the correct position. Take a look at the image below.
The Pitch motor (controls Tilt) should be located on the Left Side of your Camera (when standing behind the camera). If you have the motor on the right hand side, then the frame is both upside down and backwards. This will cause confusion with the sensor orientation as it tries to keep your camera level.
Surprisingly we receive several emails a week because of incorrect mounting of the camera. Most people will immediately start to change PID settings, and even attempt Firmware updates (not recommended unless you know what you're doing). Please double check this before attempting to modify any settings on your gimbal.
Install Camera Properly. Pitch Motor on Left Side of Camera. Rotate Gimbal Frame if Necessary to Achieve this Position. Do not Disassemble the Gimbal. Simply remove camera and rotate frame.
For tips on how to properly balance your gimbal, click here.
The following PDF document has been provided to explain instructions on modifying the Follow Modes on your CAME-TV 7800 Gimbal. These instructions are similar for other Gimbal Models as well.
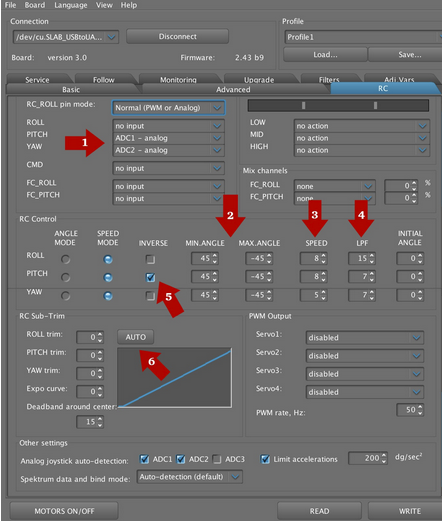
NOTE: The values above are shown as a sample only and may not pertain to your gimbal's unique RC settings. Do NOT copy them!
RC Options Explained
1.. The Joystick on the CAME-TV is a 2-Axis Joystick. This means it can control movements from either Pitch, Roll, and YAW. The default setting controls Pitch (tilt up | down) and Yaw (pan left | right). If you want to change these settings to control the ROLL of the camera, you can do this here.
2. The MIN ANGLE and MAX ANGLE is used to control the maximum allowed camera position when using the Joystick. The camera will automatically stop according to these angles. We recommend using -45 and +45 degrees. If you feel you want to control more or less camera angle through the Joystick, you can make the changes here.
3. Speed is how fast the camera movement is when the Joystick is used. A higher Value will cause the camera to move quickly when the Joystick is applied. A lower value will allow the camera to move slowly. If you want to change the speed of your camera movement when using the Joystick, you can make the changes here.
4. LPF is used to control the responsiveness of the Joystick controls.
HIGHER LPF VALUE will delay the camera movements after the Joystick is applied. The camera will also take longer to come to a complete stop after Joystick. It will basically ‘ramp up speed’ during the start of camera movement and ‘ramp down speed’ at the end of camera movement.
LOWER LPF VALUE will have immediate camera response. The camera will move immediately when the Joystick is applied, and will come to a sudden stop after Joystick application. This causes a ‘jerky motion’ which does not appear smooth, but is better for tracking very fast subjects.
5. INVERSE is used to change the direction of Joystick Controls. This is used because Joysticks can be mounted in different positions. If you move the Joystick Up and your Camera camera points down, you can change this with the Invert Option for Pitch (Tilt). After making this change, when you point your Joystick Up the Camera will point Up (instead of down).
TIP: If you apply Joystick UP and the camera pans Left or Right, and when you apply
Joystick Left the camera Tilts Up, then you can swap these controls under the first setting (see Arrow 1).
6. The RC Sub-Trim is used to calibrate the Joystick. This is an electro-mechanical control surface that over time may need calibration for it’s true Neutral Position. The most common problem is slow ‘drifting’ of camera position. When the Joystick is not calibrated properly, the gimbal believes that someone is applying Joystick commands and starts to move. To calibrate your Joystick, ensure that your Joystick is in it’s true neutral position. Make sure it’s not binding or stuck, and is centered as best possible. Then simply click on the Auto button and the values will automatically be entered. Or you can try to change these values manually to correct drift issues.
Save the Settings by clicking the WRITEButton after you’ve made the changes.
If you need additional information, this video by MrCheesycam explains more about the RC Tab and various settings.


 Adjust Follow Modes and Speed for Follow Modes on CAME-TV Gimbal - Google Docs