It has been brought to our attention that SimpleBGC GUI version 2.55 b3 is no longer available on the Basecam Electronics website. Since this software is developed externally by a third party company, we have no control over its availability through that site.
However, we know that many of you have CAME-TV gimbals that require this particular version of the software (and associated firmware). So we will provide you with a download link to the 2.55 b3 GUI version by clicking here.
If you are unsure of which software version you should use, then click here.
Just going to put this out there right now... DO NOT UPGRADE YOUR FIRMWARE, no matter what the SimpleBGC GUI screen tells you. Doing so will completely wipe out your board and can potentially cause irreversible malfunction to your gimbal. And even worse, this course of events runs you the risk of voiding your warranty.
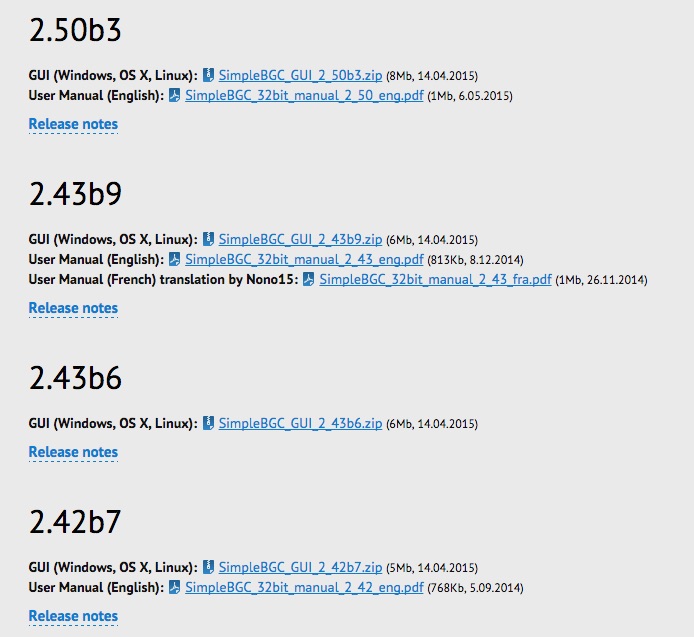
If you are attempting to connect to the SimpleBGC software for the first time, and you receive a pop-up message telling you that you should upgrade your firmware because of a "board vs. GUI mismatch" (as seen below), then it's best that you simply use a different version of the software, rather than upgrade your firmware. When this happens, simply disconnect and then quit out of the current SimpleBGC that you are using and then download the software version that is closest to the firmware version that the pop-up message is recommending.
So in the case shown above, we connected our gimbal to SimpleBGC GUI version 2.43 b9. However, the gimbal's internal control board has been programmed with a software version using firmware 2.50 b2, which is obviously higher than the GUI software that we are attempting to use (v2.43 b9). So as stated earlier, disconnect & quit out of the 2.43 b9 software, and then download and launch the version of the SimpleBGC GUI that is closest in number to the recommended firmware, which in this case would be 2.50 b3.
You should be able to connect successfully this time around with your settings completely intact.
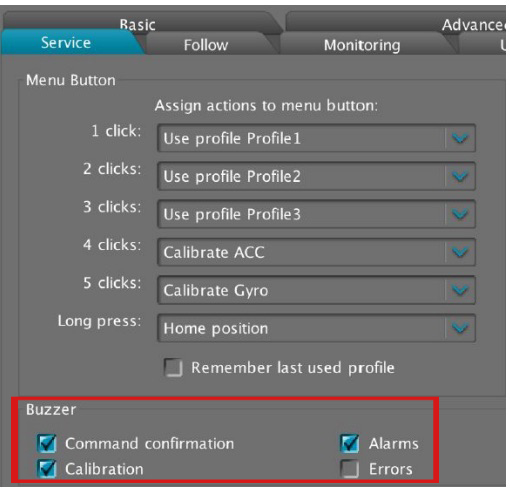
The sounds built into the gimbal serve several key functions - notifying you 1) when your gimbal is powered up, 2) when you've successfully switched profiles, 3) when your battery is running out, or 4) when it senses a general error within the system.
However, when you're right in the middle of a production, there are moments when silence is absolutely necessary - such as a wedding, a film/tv scene with recorded audio, etc. For these situations, it may be necessary to temporarily deactivate (or mute) the sounds coming from your gimbal. Simply connect to the SimpleBGC software, and then go into the Service tab and select which sounds you want to turn off.
You can always re-activate the audio alerts whenever you feel the need to.
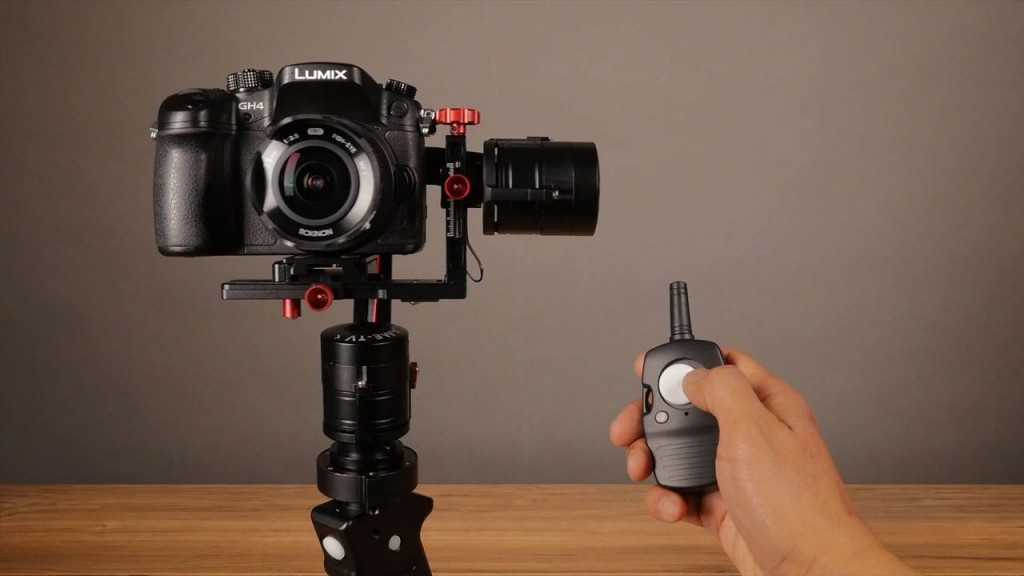
Last month we released a brand new accessory for the CAME-Single, a wireless joystick that allows you to control its pan & tilt movements remotely. It's definitely been a hit with customers so far. However, whether you are a current CAME-Single owner, or if you're looking to one day get one, it's important for us to point out that not all Singles will be compatible with the wireless remote upgrade.
So how do you know if your Single is capable of the upgrade? The most important thing to note is that ALL CAME-Singles purchased after November 1, 2015 have been modified to contain a brand new circuit board that allows for connection of the wireless joystick receiver. CAME-Singles purchased before November 2015, will not have the same board, and hence are not capable of the wireless joystick upgrade.
If you do have a newer generation Single with the modified circuit board, then installation of the wireless remote receiver board is easy! Simply open up the handle, connect the receiver board to its corresponding port, and pair the remote. Full instructions can be found in the video below.
Your card is formatted, talent's in place, and your gimbal is perfectly balanced. And just as you're about to roll camera.... your gimbal's battery dies. But wait? You charged your battery overnight, right? Even so, batteries, just like most things that involve power, have a shelf life.
The best way to avoid this nightmarish scenario is to test your batteries on a regular basis using a voltmeter/multitester. Among the many things it's capable of, a multitester can read the voltage of your battery and let you know if it has enough juice in it to perform. And just as easily, it can let you know if the battery is ready to be replaced.
If you don't own or readily have access to a voltmeter or multitester, then you can bring your battery(ies) into most electronics/repair shops or automotive garages. Most of these businesses will test your batteries for free.
Initially, you can download any version of the SimpleBGC software to connect to your gimbal. After your first successful connection, look at the version of the firmware on the screen (shown in green below).
Once you have verified the firmware version, you can go back and download the correct GUI version to match your firmware.
Typically, you will want the the software version whose number is equal or lower than the firmware version. For example, in the example above, since your gimbal has been programmed with a 2.56 b9 firmware, you will want to find a SimpleBGC software version that is equal or slightly lower than 2.56 b9. In this case, the closest software version available is 2.56 b7. You should always use the same GUI when configuring your gimbal. And most importantly, NEVER upgrade your firmware!!!
Download link for the SimpleBGC GUI software can be found here.
IMPORTANT DISCLAIMER: Please know that all CAME-TV gimbals come pre-programmed to properly function and stabilize right out of the box without the need for software tuning. However, if you choose to make adjustments using the SimpleBGC software, you do so at your own risk. If or when you choose to do so, we strongly urge you NOT to make any changes that are not recommended by us. Doing so may affect your gimbal's functionality, and may require you to send it into one of our facilities for repair at your own cost (if still under warranty). Before making any of the suggested changes below, we also advise that you save your current profiles once connecting and/or capture screenshots of each tab & profile.
——
On the most part, the CAME-TV Single gimbal can be balanced and fully operated straight out-of-the box. However, with the introduction of encoders, the most minor tweaks in the SimpleBGU calibration software can cause the Single to act somewhat erratic. Unfortunately, there is no undo button, nor is there a singular factory reset switch that can bring your gimbal back to its original state.
However, there is a very specific, yet simple 5-minute process that you can follow in order to get your gimbal functional again. Essentially, it will allow you to start over from scratch and remove any uncharacteristic behavior that you may have accidentally triggered. Tech media reviewer and colleague MrCheesycam breaks down this process step by step in the video below.
Download the CAME-TV Single Default Restoration profile if you are using SimpleBGC GUI version 2.55 b3HERE.
If you are using SimpleBGC GUI version 2.56 b7, then download and use the Restoration profile linked HERE.
Not sure which SimpleBGC version you need? Click HERE.
Please note that these restoration profiles are intended to work ONLY for the CAME-Single and will NOT work for any other gimbal model.
NOTE: If you are only experiencing minor problems with your gimbal such as light shaking and vibrations, DO NOT follow the process above. Simply lowering your Motor Power can help eliminate those problems, as referenced in this article.
In order to get smooth, steady shots with any of our CAME-TV gimbals, you want to make sure that your camera is properly balanced on them. However, sometimes our customers are so eager to put their new gimbal to use, that they don't take the time balance it accurately.
If you are reading this article, then chances are that you already have, or are in the process of balancing your gimbal. The video below, we will show you a very quick and easy test that will let you know if you've done so correctly.
All CAME-TV gimbals have been designed to support numerous camera/lens setups. That is, as long as the overall payload does not exceed that particular gimbal's pre-determined weight capacity. However, it is also possible for a camera setup to be too light. When this happens, users may notice shaking, vibrating, and even noises coming from the motor of their gimbal. But don't panic!! Essentially, the gimbal's motors have been programmed to expect a slightly heavier payload and are just working a little bit harder than they have to.
A quick fix to this problem, would be simply to lower the Motor Power in the SimpleBGC software. But first, before making any changes, we advise archiving all of your current settings (ex: saving your profile or capturing screenshots). In the unlikely event that you may have to revert back to those values, you'll at least have your screenshots for reference. Once that's done, investigate the gimbal and find out which motor (Yaw, Pitch, or Roll) is giving you problems. Once you have determined the culprit, connect to the software and reduce the Motor Power settings accordingly. Step by step details can be found in the video below.
NOTE: For heavier camera setups, simply increase motor power settings instead of decreasing them.
During this motor power adjustment process, it is ok to turn on your gimbal and test functionality after applying changes. Please know that this is a trial & error process and it may take some time to find the perfect settings for your camera setup. And just as a reminder, once you're able to determine the correct settings in one profile to stabilize your gimbal, apply those settings to the remaining 2 profiles in the Basic Tab of the software.
One of the more useful functions of any CAME-TV gimbal is the built-in joystick/remote control feature. Simply enough, the 2-axis joystick essentially allows you to do seemless panning and tilting movements while maintaining smooth and steady shots with the gimbal.
However, all gimbals come with a pre-programmed joystick speed that dictates how fast its movements are. And sometimes this default speed isn't ideal for the shot that you may want to execute. But luckily, speed can easily be adjusted using the SimpleBGC software. Full step-by-step details are shown in the video below.
Perhaps one of the more common questions we get from customers is "why is my gimbal drifting when it's powered on?." Obviously, a properly balanced and calibrated gimbal will stay put and only move when (and how) you want it to move.
A likely reason for the drifting is that the RC Sub-Trim settings may be off. The RC Sub-Trim is used to calibrate the Joystick. This is an electro-mechanical control surface that over time may need calibration for it’s true Neutral Position. The most common problem is slow ‘drifting’ of camera position. When the Joystick is not calibrated properly, the gimbal believes that someone is applying Joystick commands and starts to move. The video below will help you properly calibrate your joystick and thus likely eradicate the problem of drifting.
NOTE: If you're using a gimbal with an external wireless remote, then make sure the remote is turned on during this process.
NOTE: After completing this process, if drifting persists on any 1 profile, but is no longer present on either of the 2 Profiles, then you can manually copy the RC subtrim values from the non-drifting profile onto the profile that does drift. In other words, after completing the Auto RC-Subtrim process, if Profile 3 still drifts, but Profile 1 & 2 remains still, then you can manually copy the RC-Subtrim settings from Profile 1 or 2 onto Profile 3. Drifting should then be eliminated from all 3 profiles as a result.
When you purchase a CAME-TV gimbal, chances are that it has been pre-programmed with 3 main profiles. And each profile contains its own unique set of follow modes, which you can toggle between depending on which mode you need to use.
Profile 1 will enable Follow Modes for both Pan and Tilt (Yaw and Pitch). Profile 2 will enable Follow Mode ONLY for Pan (Yaw) and will Disable Tilt (Pitch). Profile 3 will disable All Follow Modes. The Camera heading will stay constant.
However, in the event that these follow mode settings are unknowingly or mistakenly altered in the SimpleBGC software, you can manually restore them by dialing them in yourself.
Service Modes are used to assign button clicks to various gimbal operations. On most CAME-TV gimbals, you can toggle between these different modes simply by clicking on the service button (or joystick) to operate them. By default, the first three modes are set as follows:
1 Click: Switch to Profile 1 2 Clicks: Switch to Profile 2 3 Clicks: Switch to Profile 3
To see how Profiles 1, 2, and 3 are configured, click here.
It's also a good idea to take advantage of your Service Modes by using the Profile 4 and Profile 5 options. These profiles should specifically be set to calibrate your sensors and gyro, respectively. These modes will especially come in handy when you're shooting out in the field and don't have access to your laptop to recalibrate your gimbal.
4 Clicks: Calibrate ACC (Calibrate sensors. Must hold camera and gimbal level and square when using this option) 5 Clicks: Calibrate Gyro (Calibrate Gyros. Must hold camera and gimbal level and square when using this option)
SAMPLE: Once you have Profiles 4 & 5 programmed and saved, you can now calibrate your sensors and gyros directly through the gimbal. (Demonstrated in video below with a CAME-Single, but the process applies to all CAME-TV gimbals when calibration modes have been programmed in them.)
Gimbal calibration demonstrated on CAME-Single and CAME-7800 gimbals below. (Process applies to all gimbals with service modes programmed in).
None of our gimbals currently come with a bluetooth module or support bluetooth connectivity with external mobile apps. Trying to install other third party modules into any CAME-TV gimbal may void your warranty.
Brushless Motors can be wired to spin in clockwise or counterclockwise, and the software to control them can automatically change directions. Motors on Gimbals can also be mounted in many different ways, so the software needs to detect which way is the proper rotation for your setup. This is when you may need to use the Invert option under Motor Configuration.
IMAGE IS AN EXAMPLE. DO NOT COPY THESE INVERT OPTIONS DIRECTLY. FOLLOW INSTRUCTIONS BELOW.
Once you have your sensors setup correctly, follow the instructions in the video below to determine if any of your Motors require the Invert option selected for your Gimbal.
We understand that many people want to Tune their Gimbals for different characteristics. But instead of downloading and sharing profiles, Keep in mind that Profiles carry several settings that are unique to your system. Instead of downloading and installing complete Profiles just for PID settings, we suggest just changing your PID settings manually through the software. This way you don't affect other settings such as Motor Invert Options, RC Settings, Sensor Positions, Follow Modes, etc.